To execute the exercise, the following network environments are recommended.
WS or PC running Linux + X (including a virtual machine on Windows by VMware, VirtualBox, and WSL). If you are using Windows 10 or later, WSL is a good choice.
and network connection to (192.168.11.9) by yourself.
- You can connect to daikoku (192.168.11.9) from inside the Dynamics lab network (called "secure-seis"). To connect from outside the lab network, you must connect via VPN connection to "secure-seis".
If you do not have an account on 'daikoku', please ask the instructor.
Installing SU in your computer
This is the most convenient and recommendable if you have some computer skill. You can skip here if not interested. Go to the next section.
You can install SU in your Unix environment, including PC Unix such as
cygwin, any virtual machine such as VMware and VirtualBox,
and WSL available after Windows 10 or later.
Install is fairly easy. Please consult the instructor if interested.
Connection and login
If you are connecting from outside the EVRC network (secure-seis) including outside the campus, use the EVRC VPN.
Setting Environments
Set the following environment variables before using SU.
- If you use "bash" (this is the default of most Linux distribution) or "zsh" (Mac) etc.,
 from here
 ---------
 export CWPROOT=/usr/local/cwp
 export PATH=$CWPROOT/bin:$PATH
 ---------
 till here
Append the above description to "~/.bashrc" using an editor (vi, Emacs, etc.)
 $ vi ~/.bashrc
 $ emacs ~/.bashrc &
Or, add the above settings using below.
 $ mv ~/.bashrc .bashrc.bak
 $ cat .bashrc.bak /export/watanabe/exercise/dot.bashrc.add > ~/.bashrc
Make sure that the setting was made.
$ cat ~/.bashrc
Reflect the new settings.
$ source ~/.bashrc
Then, make sure that the environment variables "CWPROOT" and "PATH" are properly set.
$ printenv
- If you use "csh" or "tcsh"
 from here
 ---------
 setenv CWPROOT /usr/local/cwp
 setenv PATH $CWPROOT/bin:$PATH
 ---------
 till here
Append the above description to "~/.cshrc" and execute "source ~/.cshrc".
Make sure that the setting was renewed.
$ cat ~/.cshrc
Reflect the new settings.
$ source ~/.cshrc
Then, make sure that the environment variables "CWPROOT" and "PATH" are properly set.
$ setenv
These environment variables will be automatically set after you open new shells or from your next login.
However, sometimes your setting will not work due to your way of access to the server. If you fail to execute SU commands (An error message, "command not found" appears), be sure to check these environment variables are properly set and if not, execute the "source" command manually.
Data
The data you are going to use in this exercise are located in the following directory on 'daikoku';
192.168.11.9:/export/watanabe/exercise
Copy the data and the scripts in the directory to your working directory.
$ mkdir exercise         (or any directory you like for this exercise)
$ cd excercise           (move into the directory)
$ cp /export/watanabe/exercise/demo*.su .       (copy the demo files)
$ cp /export/watanabe/exercise/*.sh .           (copy scripts)
$ cp /export/watanabe/exercise/*.par .          (copy parameter file for a script)
$ ln -s /export/watanabe/exercise/Nshots.su Nshots.su        (create a link to datafile)
$ ln -s /export/watanabe/exercise/Nstack.su Nstack.su        (create a link to datafile)
'*' represents any character, therefore, multiple files are copied.
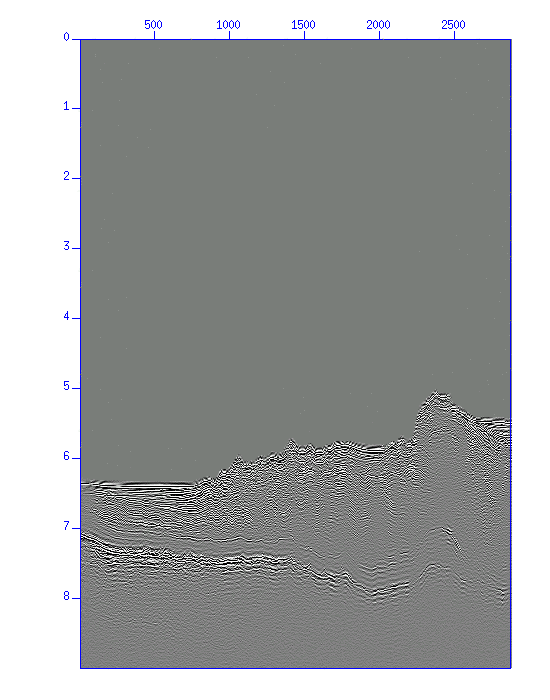
- ``Nshots.su'' is an original data record (shot records) to be processed in this exercise.
- ``Nstack.su'' is a processed record.
For these field datasets, create a symbolic link (like a short-cut used in the Windows system) to each data file,
not copying them to your working directory, because the file size of the dataset is large.
Following files are copied. Make sure using 'ls' command.
$ ls
Nshots.su            demo_bpf.su   demo_mig1.su  interactive_velocity_analysis.sh
Nstack.su            demo_dcn.su   demo_mig2.su  interactive_velocity_analysis_original.sh
create_BPF_panel.sh  demo_fkf.su   demo_mig3.su  parameters_for_interactive_velocity_analysis.par
create_CVS_panel.sh  demo_fkf2.su  demo_mig4.su  plot_seismic_section_with_velocity.sh
create_MIG_panel.sh  demo_imp.su   demo_nmo.su   plot_velocity.sh
If you are not using "daikoku", obtain datasets from here (access is limited to the students).
Basic usage
SU program, like other Unix commands, "reads data from Standard-input,
processes them and writes the result to Standard-output".
- "<" input from file
- ">" output to file
- " | " pipe
Basic syntax are like,
$ su-command opt1=value1 opt2=value2 .... (options) < input-data > output-data
$ su-command opt1=value1 opt2=value2 .... (options) < input-data | next-process ... > output-data
$ previous-process | su-command opt1=value1 opt2=value2 .... (options) | next-process ...
(Tip)
The usage of a command is displayed when you type the command without any option. You can learn how to use the command.
Execute the following commands and be sure to check that you can see
a brief help on these commands.
$ suplane
$ suxwigb
$ xwigb
$ suximage
$ ximage
Execute the following commands and be sure to check that you can see
some plots come up properly.
$ suplane | suxwigb &
$ suplane | suximage &
If you encounter errors, go back to "Setting" and
do again.